Creating handmade paper with pressed flowers and dried flowers is a delightful and rewarding craft project. Not only does it produce beautiful, unique paper, but it also allows you to preserve the natural beauty of flowers in a creative and practical way. In this comprehensive guide, we will walk you through the entire process, from gathering your materials to crafting the final product.
1. Introduction
Handmade paper with pressed flowers is not only beautiful but also environmentally friendly. This craft allows you to recycle paper and integrate natural elements into your creations. Whether you're making greeting cards, stationery, or art projects, this handmade paper will add a touch of nature and elegance.
Creating your own paper is an ancient art form that dates back centuries. Historically, paper was made by hand from various plant fibers, and this tradition has been preserved and evolved over time. Incorporating pressed flowers into handmade paper adds a modern twist to this age-old craft, allowing you to create something that is both aesthetically pleasing and environmentally sustainable. By using recycled paper, you are also contributing to reducing waste and promoting a more eco-friendly lifestyle.
Engaging in this craft can be a therapeutic and relaxing activity. It allows you to connect with nature, use your hands, and engage in a creative process that results in something tangible and beautiful. Whether you are a seasoned crafter or a beginner, making handmade paper with pressed flowers is an accessible and rewarding project that can be enjoyed by people of all ages.
2. Materials Needed
Before you begin, gather the following materials:
- Recycled paper: Old newspapers, office paper, or scrap paper
- Blender: To blend the paper into pulp
- Water: To mix with the paper pulp
- Screen or mesh: For forming the paper sheets
- Wooden frame: To hold the screen in place (you can make this or buy a papermaking mold and deckle)
- Sponges and towels: To remove excess water
- Pressed flowers and dried flowers: To embed in the paper
- Optional: Fabric or felt: To press the paper for drying
Collecting the materials for this project is the first step in embarking on your papermaking journey. The recycled paper can come from various sources. Old newspapers, office paper, junk mail, and even old greeting cards can be repurposed into beautiful handmade paper. The key is to ensure that the paper is free from any plastic or heavy coatings, as these can interfere with the papermaking process.
The blender you use does not need to be a high-end model; any standard blender will do the job. This tool is essential for breaking down the paper fibers into a pulp, which forms the base of your handmade paper. Water is the medium that helps break down the paper and create a smooth pulp, so ensure you have plenty on hand.
The screen or mesh is used to shape and form the paper. This can be a specialty papermaking screen, or you can make your own using fine mesh material stretched over a frame. The wooden frame, often referred to as a mold and deckle, is used to hold the screen and shape the paper into a uniform sheet.
Sponges and towels are necessary for removing excess water from the paper pulp. This helps to speed up the drying process and ensures that the paper is evenly formed. Pressed flowers and dried flowers are the stars of this project, adding color, texture, and beauty to your handmade paper. Finally, fabric or felt can be used to press and dry the paper, helping to absorb excess moisture and keep the paper flat as it dries.
3. Preparing Your Workspace
Set up a clean, flat workspace where you can easily manage water and paper pulp. Ensure you have enough space to lay out your materials and move around comfortably.
- Cover the workspace with plastic sheets or old newspapers to protect surfaces.
- Set up your frame and screen over a basin or large tray to catch excess water.
- Have your sponges, towels, and flowers within easy reach.

Creating a dedicated workspace for your papermaking project is crucial to ensure a smooth and enjoyable crafting experience. Choose an area with plenty of natural light and good ventilation, as you will be working with water and pulp, which can be messy. A spacious, flat surface like a large table or countertop is ideal, as it gives you ample room to spread out your materials and work comfortably.
Covering your workspace with plastic sheets or old newspapers is important to protect the surface from water damage and paper pulp. This also makes cleanup much easier, as you can simply remove and discard the protective covering once you are finished.
Setting up your frame and screen over a basin or large tray helps to catch excess water as you form the paper sheets. This setup allows you to work efficiently without worrying about water spilling everywhere. Ensure that your frame and screen are securely positioned to avoid any accidents or spills.
Having your sponges, towels, and flowers within easy reach is essential for a smooth workflow. Arrange your materials in an organized manner so that you can easily access them as needed. This helps to keep the process streamlined and enjoyable.
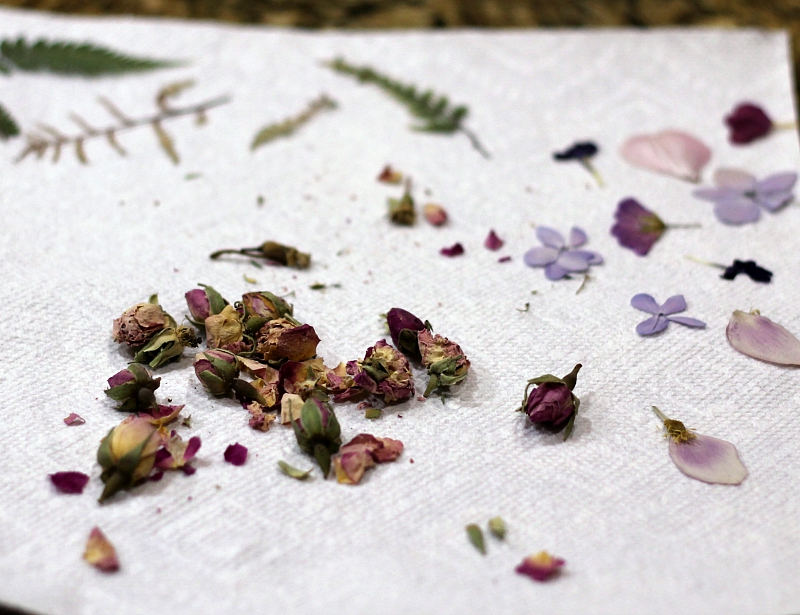
4. Collecting and Pressing Flowers
Select a variety of flowers for your paper. Delicate, flat flowers work best. Here’s how to press and dry them:
- Gather Flowers: Choose flowers that are free of pesticides and dirt.
- Press Flowers: Place the flowers between sheets of parchment paper or in a flower press. Weigh them down with heavy books if you don’t have a press.
- Drying Time: Leave the flowers to press and dry for at least 1-2 weeks.

Collecting and pressing flowers is a delightful part of this craft, as it allows you to engage with nature and select the perfect blooms for your paper. When gathering flowers, choose those that are vibrant, free of pesticides, and freshly picked. Delicate, flat flowers such as pansies, violas, and daisies work exceptionally well for this project. You can also use petals from larger flowers like roses or sunflowers for a different effect.
Once you have collected your flowers, the pressing process begins. If you do not have a flower press, you can easily create one using parchment paper and heavy books. Lay the flowers flat between sheets of parchment paper, ensuring they do not overlap. Place the parchment paper with the flowers inside a heavy book or under a stack of books. The pressure from the books will press the flowers flat and help to preserve their color and shape.
The drying time for pressed flowers is typically 1-2 weeks. This allows enough time for the flowers to fully dry and flatten, making them easier to incorporate into your handmade paper. During this period, check the flowers periodically to ensure they are drying evenly and adjust the pressure if necessary.
Pressed flowers add a unique and personal touch to your handmade paper, making each sheet a work of art. The variety of colors and shapes available in nature means that no two pieces of paper will be exactly alike, giving your creations a truly one-of-a-kind appeal.
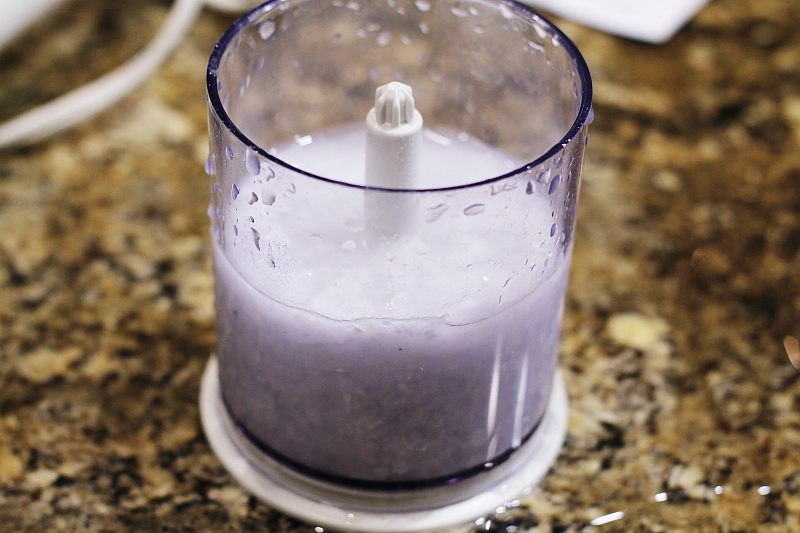
5. Making the Pulp
Creating the pulp is a fun and straightforward process:
- Tear the Paper: Rip your recycled paper into small pieces.
- Soak the Paper: Soak the pieces in water for a few hours or overnight.
- Blend the Pulp: Place the soaked paper in a blender with enough water to cover it. Blend until you have a smooth, thick pulp.

Making the pulp is the heart of the papermaking process, and it's both easy and enjoyable. Start by tearing your recycled paper into small, manageable pieces. This step is crucial because smaller pieces of paper break down more easily in water and blend into a smoother pulp. Tearing the paper can also be a relaxing and meditative activity, helping you get into the creative spirit.
Once you have your paper pieces ready, soak them in water for a few hours or overnight. Soaking the paper softens the fibers, making them easier to blend into a pulp. If you're in a hurry, soaking the paper in hot water can speed up the process, but be sure to let it cool before blending.
After the paper has soaked sufficiently, it's time to blend the pulp. Place the soaked paper pieces into a blender, adding enough water to cover them completely. Blend the mixture until you achieve a smooth, thick pulp with a consistency similar to oatmeal. Be sure to blend in batches if you have a large amount of paper to avoid overloading your blender.
The blending process is where the magic happens, as the paper fibers break down and transform into a homogenous pulp. This pulp will serve as the base for your handmade paper, providing the structure and texture needed to hold the pressed flowers.
Once you have a smooth pulp, you can proceed to the next steps of adding flowers and forming the paper. The quality of your pulp directly impacts the final appearance and texture of your handmade paper, so take your time to ensure it is blended evenly and thoroughly.
6. Adding Flowers to the Pulp
Incorporate your pressed and dried flowers into the paper pulp:
- Mix Flowers: Gently mix the flowers into the pulp, ensuring even distribution. You can add petals, leaves, and whole flowers.
- Customize: Experiment with the amount of flowers and their placement to create different designs.
Adding flowers to the pulp is where your creativity can truly shine. The flowers you pressed earlier are now ready to be incorporated into the pulp, adding color, texture, and visual interest to your handmade paper.
Begin by gently mixing the pressed flowers into the pulp. Take care to distribute the flowers evenly throughout the pulp to ensure that each sheet of paper will have a balanced and attractive appearance. You can add whole flowers, individual petals, or even small leaves, depending on the look you want to achieve.
Customizing the placement and quantity of flowers allows you to create a variety of designs. For a more subtle effect, add just a few petals or small flowers. For a bolder look, incorporate larger flowers or a higher concentration of floral elements. You can also experiment with different types of flowers and greenery to see how they interact with the paper pulp and each other.
As you mix the flowers into the pulp, consider how they will be positioned when the paper is formed. Some flowers may float to the surface, while others may sink deeper into the pulp. You can adjust their placement as needed to achieve the desired effect.
This step is all about experimenting and having fun. There are no right or wrong ways to incorporate the flowers, so feel free to get creative and try different combinations. Each batch of paper you make will be unique, reflecting your personal style and the beauty of the flowers you've chosen.
7. Forming the Paper
This step involves shaping the pulp into sheets of paper:
- Pour the Pulp: Pour the pulp onto the screen or mesh, spreading it evenly.
- Shape the Paper: Use your hands or a spatula to spread the pulp into an even layer.
- Remove Excess Water: Use a sponge to press out excess water from the pulp.

Forming the paper is a crucial step in the papermaking process, where the pulp is transformed into sheets of paper. Begin by pouring the prepared pulp onto your screen or mesh. If you are using a mold and deckle, pour the pulp inside the frame to ensure a consistent shape and size for your paper sheets.
Spread the pulp evenly across the screen using your hands or a spatula. This step requires a gentle touch to avoid tearing the screen and to ensure that the pulp forms a uniform layer. The thickness of the layer will determine the thickness of your final paper; a thinner layer will produce delicate paper, while a thicker layer will result in sturdier sheets.
Once the pulp is spread evenly, it's time to remove the excess water. Using a sponge, gently press down on the pulp to absorb and remove as much water as possible. Be careful not to press too hard, as this can disrupt the even distribution of the pulp. Repeat this process until you have removed a significant amount of water and the pulp starts to hold together.
Removing excess water is essential for the drying process, as it helps the paper to dry more quickly and evenly. It also helps to compact the fibers, making the paper stronger and more cohesive. Continue to work with the sponge until the pulp feels relatively dry to the touch but is still pliable.
Forming the paper requires patience and practice. It may take a few attempts to get the thickness and consistency just right, but the results are well worth the effort. Each sheet of paper you form will have its own unique character, showcasing the beauty of the flowers and the craftsmanship of your work.
8. Drying and Pressing the Paper
Proper drying ensures that the paper is flat and strong:
- Lift the Paper: Carefully lift the screen, releasing the wet sheet.
- Transfer the Paper: Place the sheet on a flat, absorbent surface like a towel or felt.
- Press and Dry: Cover with another towel and place a heavy object on top. Leave to dry completely for 1-2 days.
Drying and pressing the paper is a critical step to ensure that your handmade paper is flat, smooth, and durable. Once you have formed the paper sheet, carefully lift the screen to release the wet paper. This step requires a gentle touch to prevent the paper from tearing or losing its shape.
Transfer the wet sheet to a flat, absorbent surface such as a towel or piece of felt. This surface will help to draw out additional moisture from the paper, aiding in the drying process. Carefully lay the sheet flat, ensuring that it is free from wrinkles or folds.

To press and dry the paper, cover the sheet with another towel or piece of felt. This additional layer helps to absorb moisture from the top of the paper and protects it from any dust or debris. Place a heavy object, such as a stack of books or a wooden board, on top of the covered paper. The weight will press the paper flat and help it to dry evenly.
Leave the paper to dry completely for 1-2 days. The drying time may vary depending on the thickness of the paper and the humidity in your environment. It is essential to ensure that the paper is completely dry before handling it, as any remaining moisture can cause the paper to warp or tear.
During the drying process, periodically check the paper to ensure it is drying evenly. You can adjust the weight or reposition the paper if necessary to achieve the best results. Once the paper is fully dry, carefully remove the weights and towels to reveal your finished handmade paper.
9. Finishing Touches
After drying, give your paper a final polish:
- Trim Edges: Use scissors or a craft knife to trim any uneven edges.
- Press Again: If needed, press the paper again to ensure it is flat.
Finishing touches add the final layer of refinement to your handmade paper, transforming it from a raw craft project into a polished, professional-looking product. Once the paper is completely dry, examine the edges and trim any uneven or rough areas using scissors or a craft knife. This step helps to create clean, crisp edges and gives your paper a more uniform appearance.
If you find that the paper has any remaining wrinkles or is not as flat as you would like, you can press it again. Place the paper between two pieces of felt or soft cloth and apply weight, such as heavy books or a press, for a few more hours or overnight. This additional pressing helps to further flatten the paper and remove any minor imperfections.
Finishing touches are an opportunity to refine and perfect your paper, ensuring that it meets your standards of quality and beauty. Taking the time to trim and press the paper shows attention to detail and craftsmanship, resulting in a product that you can be proud of.
10. Creative Uses for Handmade Flower Paper
Handmade flower paper can be used in various creative projects:
- Greeting Cards: Create personalized cards for special occasions.
- Stationery: Make unique writing paper and envelopes.
- Art Projects: Use as a canvas for painting or drawing.
- Gift Wrapping: Add a personal touch to small gifts.
.jpeg?w=292&h=270)
The creative possibilities for handmade flower paper are virtually limitless. This unique and beautiful paper can be used in a wide range of projects, adding a personal and artistic touch to your creations.
One popular use for handmade flower paper is in greeting cards. Whether for birthdays, anniversaries, holidays, or other special occasions, handmade cards are always cherished by recipients. The addition of pressed flowers adds a natural, elegant element that sets your cards apart from store-bought options.
Handmade flower paper also makes stunning stationery. You can create personalized writing paper and matching envelopes, perfect for sending heartfelt letters or notes. The unique texture and appearance of the paper will make your correspondence stand out and be remembered.
For artists and crafters, handmade flower paper provides a beautiful canvas for painting, drawing, and other art projects. The natural elements embedded in the paper add depth and interest to your artwork, making each piece truly one-of-a-kind.
Gift wrapping with handmade flower paper adds a special touch to any present. The paper itself becomes part of the gift, showcasing your creativity and thoughtfulness. Use it to wrap small gifts, create gift tags, or even make decorative boxes.
.jpeg?w=474&h=474)
11. Tips and Troubleshooting
Here are some tips and solutions to common issues:
- Even Pulp: Ensure the pulp is blended smoothly for consistent texture.
- Flower Placement: Strategically place flowers to avoid clumping.
- Drying: Make sure paper is fully dry before handling to prevent tearing.
Creating handmade paper can sometimes present challenges, but with a few tips and some troubleshooting, you can overcome common issues and achieve beautiful results.
One key tip is to ensure that your pulp is blended smoothly. Consistent texture in the pulp is crucial for forming even, sturdy paper. If your pulp is too chunky or uneven, blend it for a bit longer until it reaches the desired consistency.
Flower placement is another important consideration. When adding flowers to the pulp, be mindful of their distribution to avoid clumping. Strategically placing the flowers helps to create a balanced and aesthetically pleasing design. If you find that flowers are bunching together, gently rearrange them with your fingers or a small tool.
Proper drying is essential for the durability of your handmade paper. Make sure the paper is fully dry before handling it to prevent tearing or warping. If you are unsure whether the paper is completely dry, give it a little extra time to be safe.
12. Conclusion
Making handmade paper with pressed flowers is a wonderful way to blend art and nature. It is a sustainable, creative process that results in stunning, personalized paper. Whether you're an experienced crafter or a beginner, this project is sure to provide hours of enjoyment and beautiful outcomes.
We invite you to visit our website for more craft tutorials and handmade products. Explore our collection and find inspiration for your next creative project!
end
This comprehensive guide provides all the steps and tips you need to create beautiful handmade paper with pressed flowers. If you have any questions or need further assistance, feel free to reach out. Happy crafting!